Thursday, October 10, 2019

Salesforce Favorites: Frequently Used Information at Your Finger Tips


  • Always need reports from a specific folder?
  • Have a report that you run frequently?
  • Have that one Account that you are constantly nurturing?
  • Frequent a related list on a tab?

Salesforce Favorites to the rescue!

A Favorite is similar to a bookmark, it allows you to quickly access important records, lists, groups, and other frequently used pages in Salesforce by making them a Favorite. 

Adding a Favorite

From the record or spot you want to favorite, simply click on the Favorite Star in the upper-right hand side of your browser.


Accessing Your Favorites

To access Favorite items. click on the drop-down to the left of the star and choose it from the list.


Considerations when using Favorites  

You can have up to 200 favorites.  Favorites support these types of content:
  • Record home for standard and custom objects
  • Lists
  • Dashboards
  • Reports
  • Report and dashboard folders
  • Chatter groups

Individuals manage their own favorites. Salesforce admins can’t edit or share favorites.

For more considerations see: https://help.salesforce.com/articleView?id=user_userdisplay_favorites_considerations.htm&type=5

Sunday, September 22, 2019

Modifying the fields in the Lightning Page Highlights Panel

The fields found on the highlights panel come from the Compact Page Layout for that object.  There are separate compact layouts for each object.   A Compact Layout can be assigned as the default for all record types or each Record Types can have it's own compact layout.  This comes in handy if you want one view of the Highlights panel for Organization Accounts and a different one for Household Accounts.

Compact Layouts also control the fields you see when you over a lookup relationship field on the object record page.

Highlights Panel


Compact Layouts support all field types except:

  • text area
  • long text area
  • rich text area
  • multi-select picklist

Creating or Modifying a Compact Layout


  • From Setup, choose the object for which you want to create or modify the Compact Layout.
  • Choose Compact Layouts.
  • Edit or Create a new compact layout and give it a label.
  • Add up to 10 fields
  • Sort the fields by selecting them and clicking Up or Down.
  • The order determines the order in which the fields will display.

  • Save the layout.
  • To set the compact layout as the primary compact layout for the object or to assign the compact layout to a specific record type, click Compact Layout Assignment. 
  • Set the Compact Layout assignment and Save.


The first four fields chosen on your compact layout populate the record highlights section at the top of each record view in the Salesforce mobile app. The record highlights section in Lightning Experience uses the first six fields on the compact layout.

In the Salesforce mobile app, the fields that you assign to a compact layout appear in:

  • An object record’s highlights area (shows up to ten fields)
  • Expanded lookup cards on a record’s related information page (shows the first four fields)


For more information see: https://help.salesforce.com/articleView?id=compact_layout_overview.htm&type=5

Saturday, August 31, 2019

Constant Contact and Salesforce Integration using Cazoomi Sync Apps

When Constant Contact stopped supporting their Salesforce integration, customers were left with having to find an alternative.  There are several available, this blog looks at Constant Contact and Salesforce using Cazoomi's Sync Apps third party product.

Cazoomi is one of several organizations that focuses solely on providing third party bidirectional data integration between two applications.  In addition to supporting Constant Contact and Salesforce integration, they also support many other Salesforce integrations such as Mail Chimp, Eventbrite, and others.  For more information see the Cazoomi webstie at https://www.cazoomi.com/

What Plan do I Need?

From a Salesforce perspective, you'll need access to the Salesforce API.  Since the nonprofit donation is the Enterprise version of Salesforce, you automatically have this.  If you do not have the Enterprise version or higher, you will need to confirm if you have access to the Salesforce API.

From a Cazoomi standpoint, it depends on what level of integration desired but most organizations choose the Professional Plan.  Nonprofit's are offered at 50% discount off the regular price.

How Does it Work?

Once you have your Cazoomi account, you can setup sync profiles to copy information to/from Salesforce and Constant Contact.  

What are Sync Profiles?

A Sync Profile is just a term meaning your integration, the definition of how data will flow between the two applications you are synchronizing.   You may have one or more sync profiles setup as part of your integration.

Sync Profile Examples
  • Sync a Master List - sync all of the Contact and/or Lead records from Salesforce to Constant Contact.  
  • Sync Specific Campaigns - sync all of the members of specific campaigns from Salesforce to Constant Contact.

Setting up Sync Profiles

This blog covers some important considerations when setting up the Sync Profiles.  For step by step instructions, see Cazoomi's documentation:  https://support.cazoomi.com/hc/en-us/articles/360006824932

Attaching the Sync Profile to Salesforce via a User Account
Best practice is to have a Salesforce user account dedicated for integrations.  This integration user account should be used as as the login for the sync profile.  If your organization cannot designated a dedicated integration user and uses a staff user account, if the staff user account used a becomes inactive, the integration will break.  In this scenario, the sync profile will need to be updated to use a different active user account.


Syncing Contacts, Leads or Both
Most nonprofits are satisfied with only syncing Contacts however if both Contacts and Leads need synchronizing, a sync profiles will be needed for each.  

Synchronizing from Salesforce to Constant Contact
A sync profile has two sections, Sync from Salesforce to Constant Contact and Sync from Constant Contact to Salesforce.

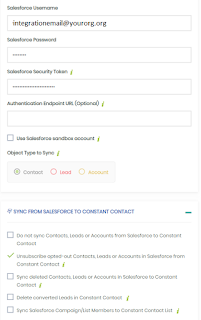
Sync from Salesforce to Constant Contact Section
Most organizations, at minimum, will create a master list to synchronize all Contacts from Salesforce to Constant Contact.  When creating your new profile, Expand the Sync from Salesforce to Constant Contact section to review the available options.   In this section, I recommend selecting the option Unsubscribe opted-out Contacts, Leads or Accounts in Salesforce from Constant Contact.  There may be times when Salesforce's Email Opt-out field is updated by as staff person from within Salesforce.  To be sure that this preference is reflected in Constant Contact, choose the Unsubscribe opted-out Contacts, Leads or Accounts in Salesforce from Constant Contact option.

Since we are setting up our Master List sync adn want to sync all of the Contacts, not just those that are members of a campaign we will NOT select the Sync Salesforce Campaign/List Members to Constant Contact List.  If this option is selected, only those Contacts that are also members of a campaign will be synchronized.


Sync from Constant Contact to Salesforce Section
Some organizations want to see within Salesforce outcomes related to the mailing sent from within Constant Contact.  Information can be pushed back into Salesforce through the selection made in the Campaign Response Sync Mode option.  For detailed information about the available options see: https://support.cazoomi.com/hc/en-us/articles/360000346371.   Which option you choose may depending upon the volume of emails sent by your organization.  Data storage levels should be monitored in Salesforce if sending detailed open, bounce and click information back to Salesforce.


Field Mapping
Cazoomi's Professional Plan comes with field mapping.   If you do not have the Professional plan or above, you can pay extra to be able to map fields from Salesforce to Constant Contact.  As of the time of this blog, the Constant Contact API allows for up to the 15 custom fields to be mapped.   One of the 15 custom fields must be used when synchronizing custom data such as demographics.

Constant Contact Fields
Custom fields are located within My Settings in the Contact Settings section.


Wednesday, July 10, 2019

NPSP System Fields - Which ones are used?


There are behind the scenes NPSP fields on the Contact, Account and Opportunity objects.  This post describes the fields and how they are typically populated.


The system fields on the Contact and Account should contain values based on the NPSP Account model used by your organization.  Those Account Models are One-to-One Individual, Bucket Individual and Household Account.

The proper field settings for the account model field combinations are shown below:

One-to-One Account model
npe01__SYSTEM_AccountType__c (text): "One-to-One Individual"
npe01__SYSTEMIsIndividual__c (checkbox): TRUE
npe01__One2OneContact__c (lookup): Contact record ID

Household Account model
_SYSTEM:IsIndividual: TRUE
_SYSTEM:AccountType: Household Account
RecordType/RecordType.Name: Household Account
Account Type/Type := a picklist that can be customized as an organization's chooses.

Settings for Organization
_SYSTEM:IsIndividual: FALSE
_SYSTEM:AccountType: <blank>
RecordType/RecordType.Name: Organization


Opportunity Fields
On an Opportunity record you will see two fields one called Contact Id For Role Synching and Primary Contact.

The Contact Id For Role is a legacy field and is no longer used by NPSP and is left blank when entering data via the front end.  If you import information into this field it will create a Contact Role but in general should not be used.  The proper field is the Primary Contact on the opportunity.  When populated this updates the Primary Contact Role.

Wednesday, May 15, 2019

Use Quick Actions to Display Record Details

Salesforce's Lighting interface has opened up a ton of possibilities for creating better user experiences, this short article will look at just one of them. 

Sally, the Director of Development for a small nonprofit, spends most of her day in Salesforce communicating with constituents. When she makes her phone calls, it is important for her to know the giving history of the person she is calling. She doesn't like the fact that she needs to scroll down the Contact's detail page to find the donation summary information. The detail page is loaded with fields and Sally finds this process extremely cumbersome. She would like to be able to quickly see the contacts total life-time gifts, the households total life-time gifts, total gifts given this year, last year and the last gift date and amount. 

Bobby, the Salesforce Admin, is super excited because he knows he can make it happen in Lightning. Bobby is able to add a tab to the Contact's record page showing Sally just the information she wants to see. Instead of scrolling down a long page of details, Sally can look at a tab containing just the information she wants to see.

Let's look at how he was able to do it! 

Step 1 - First Bobby created a new Update Action on the Contact object that contained only the donation summary fields that Sally needed. 

Watch this short video to see how.


Step 2 - Next Bobby added the Update Action to the Contact Lightning Page. He edited the Contact Lightning Page, added a new Tab to the page and called it Donation Summary. He dropped the Related Record Lightning Component on the new tab and selected the Update Action that he created in Step 1. He saved the page and voila -- he was done! 

Watch this short video to see how.


It took Bobby less than 15 minutes to deliver a solution to improve Sally's daily process. Sally is thrilled and Bobby looks like a rock star!

Sunday, April 28, 2019

Pin Your Most Used List View on a Tab

Tired of going to a Tab and always switching the List View from Most Recent records to something you actually want to see?  Well there's a Lightning only feature you are going to love!

Step 1 - go to the tab that contains the List View you want to Pin.
Step 2 - Use the drop-down to select the List View you most commonly use
Step 3 - To pin the list view, click its pin icon Pin icon. Whenever you select that object, the pinned list view loads as the default list view.  To unpin the List View, click the Pin icon again.

Yep it's just that simple!


For more information see: https://help.salesforce.com/articleView?id=basics_pinned_list_views_lex.htm&type=5

Monday, March 18, 2019

Calculating NPSP Levels using a Formula Field

NPSP Levels provide a way of categorizing constituent's level of commitment and engagement.  For example you might have a level you call Major Donor to categorize those who contribute large amounts of money.

The assignment of engagement Levels are based on either a number or currency field. This could be existing field like Total Gifts or Average Gift Amount or formula field that returns a numeric value to handle more complex measurements.  An example of this would be a RFM calculation (Recency, Frequency, Monetary) or based a point based system.  

In this post we are going to take a look at a points based system.  By creating a formula field to use for our levels so that we can use more complex data points to determine our level of engagement for our constituents.   We are measuring engagement at the household level.

In this example we have four engagement levels, Endorsing, Contributing, Owning and Leading.  Each of our levels if represented by a specific number of points.  The more points the household has, the higher the level of engagement.


Step 1:  Create the formula field that calculates the points for our Level.

On the Account object create a new formula field with a return type of Number.


We'll create a formula field that will calculate our points based on how engaged the household is with our organization.  We'll measure this using three metrics 1) number of times someone in the household was a team captain at one of our walk events 2) number of gifts the household has given in the last 5 years 3) total dollar amount of lifetime giving of the household.

For each of these categories, the household will receive points.  The points for each of the three categories will be added together to come up with the total engagement score.  This engagement score will drive the engagement Level of the household.


Step 2:  Configure Levels to use the new calculated field.

You'll want to have setup your Level fields before you do this step.  For more information on configuring levels see:  https://powerofus.force.com/articles/Resource/NPSP-Create-and-Manage-Levels.

From the Level tab, choose New.  For each level complete the fields shown.  The example below if for our first level, Endorsing.  Households are in this level if they have and engagement score of 1 to 5.
  • Level Name:  Name you are calling this level
  • Target:  Object to hold the level.  In our example Account as we are setting the level at the Household.
  • Source Field:  Calculated field we created in Step 1 that determines our engagement score.
  • Level Field:  Field on the object that will store the name of the current level 
  • Previous Level:  Field on the object that will store the name of the previous level
  • Minimum Amount:  Minimum value that qualifies for this level
  • Maximum Amount:  Score has to be less than this value to qualify for this level
  • Engagement Plan Template:  (optional) template if tying this level to an engagement plan template.


Step 3:  Repeat this process for each Level desired.


Levels calculate in nightly batch - can force run the batch in NPSP Settings.


Salesforce Favorites: Frequently Used Information at Your Finger Tips

Always need reports from a specific folder? Have a report that you run frequently? Have that one Account that you are constantly nurtur...